


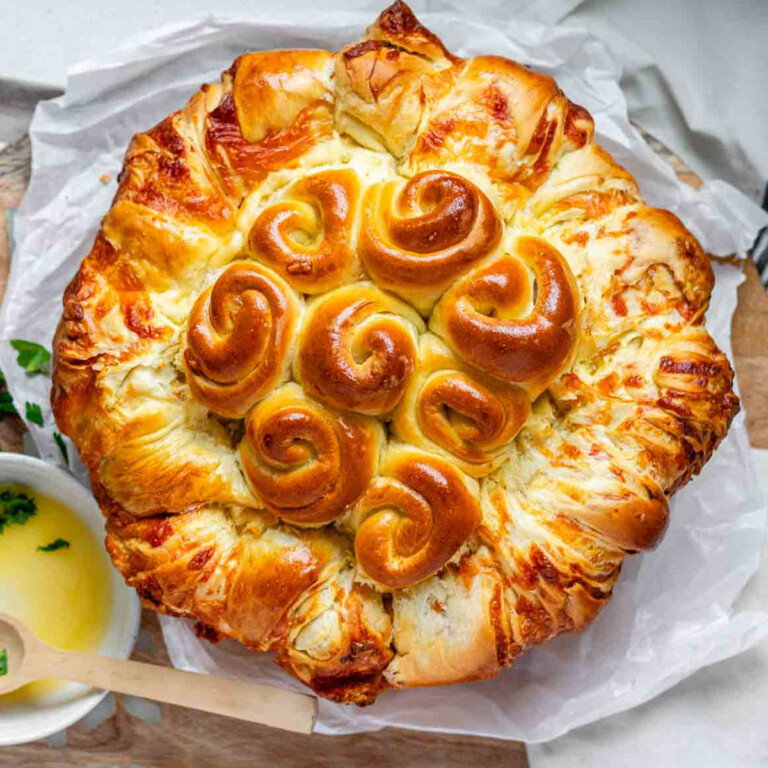
Quick & Light Brioche Style Buns | These light brioche buns are quick and easy, with only one rise time if you prefer. This is a simple and delicious homemade bread recipe, with a rewarding fluffy brioche bun and only 15 minutes baking time. Add some seeds or herbs on top to change it up!

Featured Review
Don’t you just love fresh-baked bread?
When I learned how to bake bread and buns, a whole new world opened up for me. It’s one of the most comforting processes, smells, and tastes. I love spending time making, kneading, and shaping dough. The reward is so totally worth the time spent.
This recipe, however, is a quick brioche recipe. You don’t have to spend all day in the kitchen to have fresh homemade baked buns for dinner. This recipe is a lighter type of brioche bun in that I use only a few tablespoons of butter and not much sweetener. The result is a light and fluffy bun.
How Many Times Does Brioche Dough Need to Rise?
Sometimes I let this brioche dough rise twice if I have the time, but most of the time I just mix it up and then shape it, let it rise for 40 minutes or so and then bake for 15-20 minutes. Dinner buns in about an hour = yes, please.
You’ll get better results if you let the dough rise twice.
To allow the dough to rise twice, make the dough and let it rise in the bowl until doubled in size. Punch down the dough and then shape it into buns.
Scroll down to the recipe card to see a video walkthrough, step-by-step photos, and reader tips that took this recipe from good to “never buy buns again” level.

How Do You Shape Brioche Buns
To divide the dough into 8 pieces for hamburger buns, flatten the dough out into a circle. Now cut the dough with a knife or a bench scraper, as you would a pizza or a pie.
Take each section and pull the rough edges around and pinch them together underneath the ball. Next, I cup my hand over the top smooth part of the ball, place the ball seam side down on the counter, and kind of roll it around, moving my hand clockwise in a circle.
Jump to the recipe card to see a video walkthrough.
Then I pinch the bottom seam together again if it needs it and place it on the baking sheet. Cover the shaped buns with a towel and let them rise again. Next, brush the buns with an egg wash and bake them.
But this is a quick brioche bun recipe so if you need burger buns in a hurry, follow the method for letting it rise once only, skipping that first rise in the bowl.
Note: As I’ve said, you will see the best results with two rises – most Pinterest users agree with that in the comments on the pins for this recipe. Also, one user found that after 30 minutes, the buns weren’t rising all that much, but 10 minutes later, they were perfect.
Are you baking bread in a high altitude? Check the below for a tip from a Pinterest user.
How to Bake Brioche Buns at High Altitude
The following is a tip from Pinterest user Julia Opperman, which might work for you.
“I live in Colorado at 8,900 feet. My first attempt at these, 3.5 cups of flour made the dough too dense. Second try, I used 2.75 cups of flour and they turned out perfectly. But only made 6 decent sized rolls. Definitely will make again, sooo good!”
Featured Review

Brioche Buns for Burgers
I use these buns for my Turkey Burger recipe, which is a leaner burger patty. I have not had it with a beef burger, but I have to smile every time I think of it because of Anthony Bourdain‘s write up in his newest cookbook Appetites, (RIP Mr. Bourdain) about the right and wrong bun for burgers (Potato = correct, Brioche = wrong, according to him).
If I remember correctly, I think he even named the brioche hamburger bun a crime against food elsewhere. (Just funny that he can have such a strong opinion, they’re buns haha) I’m not bothered with how you want to serve them – it’s your kitchen, babe! I’d serve a burger on them. (Update: I have since used these buns for beef burgers, many times, and LOVE them this way. )
I’d also make Brioche Slider Buns with them – to do this portion the dough into 12-16 instead of 8, depending on the size you want.

Ingredients
See the recipe card for exact amounts.

- flour: I use all-purpose flour for this recipe and most of my bread recipes. Make sure to weigh the flour. Read my article on how to measure flour to see how you can accidentally use to much flour when using measuring cups.
- yeast: I use instant yeast, which helps these buns rise quickly and skips the step of proofing in warm water. Make sure your yeast is fresh.
- sugar: You can also use honey.
- milk: I’ve used cow’s milk and non-dairy milk like almond and cashew, and all three work well in this recipe.
- salt: I used pink Himilayan sea salt in these photos, but I mostly use white sea salt now.
- eggs: I use large eggs in all of my recipes.
- butter: I use unsalted butter. If you only have salted butter, just take a pinch or two out of the salt amount for the recipe to avoid overly salty buns.
Featured Review
How to make Quick & Light Brioche Buns
First, warm the milk. Put the butter in with it to melt as well. Don’t make it too hot though, or you’ll kill the yeast. It should feel warm to the touch, but not hot! Use a thermometer for best results. The ideal temperature is between 120˚F and 130˚F.
In the bowl of a stand mixer, add the warm milk, melted butter, honey or sugar, and the yeast. Whisk it together and then whisk in the eggs and mix them well.
Add the flour and then the salt on top of that. Whether you are weighing your flour or using a measuring cup, don’t add in the full amount at the beginning. Start with 2.5 – 3 cups and add more as needed – even if you need the full 4 cups.
Some Pinterest users (especially in higher altitudes) have found that adding all of the flour in to start is way to much flour for their baking environments. We all bake in different environments and with different products – starting off with half the flour first and adding more only as needed will help you avoid a dense bun.
(It’s a bummer wasting ingredients and I don’t want to see you do that, so please start off slow with the flour.)
Put the dough hook on the stand mixer and mix on medium for 8-10 minutes. The dough should come away from the sides of the bowl and be a bit tacky but not too sticky.
You can cover the bowl with plastic wrap and let it rise here if you want but I usually skip this stage. (You’ll get fluffier, airier buns if you let it rise twice.)
Portion the dough into 8 pieces and roll each one into a ball shape. (You can make these into brioche slider buns by portioning the dough into 12 – 16 instead.)

Set the buns on a baking sheet lined with a silicone mat, cover them with a towel and let them rise for about half an hour to an hour or so and then heat the oven to 400 °F.

I like an egg wash because they come out shiny with a bit of color. This is also a good way to stick sesame seeds on.

Bake for 15-20 minutes and then let cool on a wire rack before eating.

Frequently Asked Questions about these Quick & Light Brioche Buns
No, but you will get better results by using a scale. If you are not using a scale, then carefully measure the flour with measuring cups and don’t add in the full amount right from the start. Read my article on how to measure flour correctly.
Fluff your flour up with a fork or whisk, and then use a spoon to add the flour to the measuring cup. If you use the measuring cup as a “scoop” for the flour, it may pack it down, resulting in too much flour per cup. Read my article to see the difference in flour amounts when weighing and measuring in a cup. Also, make sure to use dry ingredient measuring cups. Read about the difference between dry and wet ingredients measuring cups.
I go by 120 grams = 1 cup all-purpose flour.
To make this recipe by hand, just knead the dough in the bowl for a minute after you add most of the flour, adding more only as needed. Then move the dough to a countertop and keep kneading the dough for 10-15 minutes, until smooth.
This is a tackier dough, so you may need a bench scraper or something similar to move the dough around when mixing by hand. Use a lightly floured countertop so you don’t add too much extra flour into the dough – it should remain tacky but not overly sticky.

More Bread and Bun Recipes

If you’ve made this Brioche Buns recipe or another recipe on Pipercooks, I’d love it if you’d leave a comment with a recipe rating. I want to know how you enjoyed it, and ratings help other people know that the recipe is worth trying.

Quick + Light Brioche Buns Recipe
Equipment
Ingredients
- ⅔ cup milk warm
- 1 ½ tablespoons instant yeast
- 2 tablespoons honey or sugar
- 4 tablespoons unsalted butter melted
- 2 large eggs at room temperature
- 480 grams all-purpose flour about 4 cups *see notes
- 1 teaspoon sea salt
- 1 large egg (for egg wash)
Instructions
- In the bowl of a stand mixer, whisk together warm milk, melted butter, sugar or honey, and yeast. Add eggs and whisk well.
- Add the flour and salt. If you are not weighing your flour, start with 3 1/2 cups of flour and mix that in. Add more only if needed. (see notes)
- Use a dough hook, and mix on medium-low for 8 to 10 minutes or so. The dough should come away from the side of the bowl for the most part, and be sticky and soft. It will stay a bit tacky, that's fine – you don't want the buns to be dense.
- Optional: Let rise until doubled in size, covered with a damp, warm towel, then punch down and move on to the next step.
- Divide into 8 equal pieces (or 12 – 16 for sliders). Shape each dough ball by pinching the bottom of the dough ball together and then cupping your hand on top of it on the counter. Circle your hand over the top of the ball, rolling the dough ball around gently until the top is smooth. Pinch together the bottom if needed and set on a baking tray lined with parchment paper or a silicone baking mat. Cover with a towel.
- Let rise in a warm spot until almost doubled, about 30-45 minutes or so (depending on the warmth in your kitchen).
- Preheat oven to 400°F (200°C).
- Whisk an egg with a teaspoon of water and brush over the top of the buns. Bake for 15 – 20 minutes, until golden brown and completely cooked. Time varies as ovens vary, so watch the buns carefully halfway through cooking time.
Video
Notes
- When measuring flour, I go by 120 grams per cup. If you’d like to use cup measurement for the flour, then I’d say start with about 2 1/2 – 3 cups of flour, measured lightly by scooping your flour into the measuring cup, and not digging your cup into the flour. You’ll get the best results by using a scale, though. Read my guide on how to measure flour.
- To make this recipe by hand, just knead the dough in the bowl for a minute after you add the flour and then switch to a countertop and keep kneading the dough for 10-15 minutes, until smooth. This is a tackier dough, so you may need a bench scraper or something similar to move the dough around. Use a lightly floured countertop so you don’t add too much extra flour into the dough – it should remain tacky but not overly sticky.
Nutritional information is an estimate. Values vary based on products used. Read our full Nutrition Disclaimer.

SHARE THIS RECIPE
Rating, commenting, and sharing my recipes really helps. Thanks for taking the time! Mention @pipercooksblog on Instagram.

I just love making brioche, it’s such a rewarding bake seeing them puff like crazy with all the yeast. I love the gloss on your brown buns. I frequently make them for beef burgers so I guess Anthony would have me chucked in food jail 😉
Haha, isn’t it funny that he can have such a STRONG viewpoint on it? They’re just buns 🙂 Makes me laugh.
I couldn’t agree more about the fun of baking bread, it is just so incredibly satisfying to see the rise, and then of course to sample the delicious results! I especially love the glossy tops you have here – egg wash for the win!
Thanks Monica!
Soft and gorgeously golden. Great and easy to follow recipe.
That’s great Minnie, glad you enjoyed them! Thanks for commenting 🙂
Love this recipe. It comes out perfect all the time. Thanks for recipe.
I’m glad to hear that Uma, thanks for commenting!
I’m think these would be great with burgers – not too sweet but a step up from regular buns.
Thanks Lucy 🙂
I’m a sucker for golden brown and shiny rolls. These look yummy! I’m dying to try this recipe and I’m planning on prepping the dough soon. Pinned!
Thanks for pinning, I hope you love them!
We always buy brioche buns for burger night, but I am going to have to try making them myself as they look super easy
They are, try it out! 🙂
Oh man! I love fresh baked bread with some butter melting in it, yum. I’m a big fan of different kinds of buns so I might try this. Thanks for sharing!
Thanks Fred!
I <3 brioche and your recipe pictures are gorgeous! Must try.
Thanks Shelley!
So I ended up making these for a few chuck burgers. Anthony B., I love you man, but my GOD these were delish for beef. The only thing I could imagine he wouldn’t like is it is a little denser than reg. buns or potato but not enough to not enjoy the flavor of the meat. Piper, you’re on to something. ;D
Thanks for your comment, I’m glad you liked them! I’m definitely going to try them with a beef patty too, now that it’s grilling season 🙂
Hi Jacqualine, thanks so much for your prompt reply. I will try it.
Hi! I just have active dry yeast. How to use it with this recipe? Thanks so much in advance!
Hi! To sub in active dry yeast just add it in with the warm milk, honey/sugar, and melted butter in step 1. Then wait about 10 minutes for your yeast to proof. When it’s foamy, it’s ready to go, and you can carry on with the recipe! Hope that helps!
So I didn’t read the recipe very well and thought it was weird that the yeast didn’t have to sit for 10 minutes to get foamy. I now I wonder why the buns are not rising.
I’m sorry that happened, Janette. I’ll make a clearer note in the recipe card about using Instant Yeast vs. Active Dry Yeast. Thanks for the comment, it helps me to know what to improve.
Jacqueline
I don’t normally post comments for anything but I loved this recipe so much, I just had to let everyone else know how incredibly delicious it is. Even my dad who is a bit of a bread snob asked me how I made it! Thank you for sharing. 🙂
Thank you so much Sonia, for taking the time to comment. I’m glad you and your family liked these 🙂
I made these twice, trying both one and two risings. They were lighter and fluffier with 2nd rising, but they don’t hold up as well with condiments and lettuce or tomatoes. I used the once-risen batch with pulled pork and it was an excellent pairing. Thanks so much for this recipe!
I’ll have to try them with pulled pork, thank you for your comment! I’m glad you like the recipe.
Just made these twice. Wasn’t satisfied with my first result and I knew why. I didn’t weigh the flour and instead spooned about 3.5 cups into a one cup measure. They had trouble rising and were too dense. Second time around I spooned 3 cups into a 1 cup measure 3 times and voila! Perfect dough! It was a bit sticky, soft and seemed very moist. I knew it was right when I let it rise for 30 minutes and it was big and fluffy. Punched down, split into 8 pieces. Shaped them, places on a lined cookie sheet and pressed down to make them wider with the bottom of a small plate. Egg washed, baked at 400 for only 10 minutes and they are absolutely PERFECT! Soft, shiny and delicious! I’ll make these time and time again!
Thanks for your comment Sarah! I’m glad you tried them again – I always have more success with weighing flour.
Oh and I let them rise after I shaped and pressed them! That’s important too! Rose for 30 minutes.
What if you don’t have a stand mixer?
Hi Peter,
If you don’t have a stand mixer, you can just do all the steps by hand, starting with a fork or whisk to mix up the liquids, then either keep using the fork, or a wooden spoon to stir while adding the flour. Finally, use your hands on a lightly floured work surface to knead the dough until it’s smooth. This is a sticky dough, so a bench scraper would probably be handy if you have one. A large spatula might work also for that. You would have to be careful not to add too much flour.
Thanks for the question. I will update the post with this information soon.
Hello!
I absolutely love brioche buns, and have been determined to make some. I followed your recipe, but for some reason, the buns did not rise as much as I would’ve liked, and they’re very “doughy,” like raw, but not raw. They’re thick and heavy. Do you know why that could be? I’ve made another recipe before with a loaf, and it was the same thing. I know I followed the recipe correctly, and all my ingredients are fresh.
Hi Merylin, I’m sorry to hear that! Let’s try to troubleshoot. A few things I can think of are: 1. Did you weigh the flour? Or use measuring cups? 2. Was your water warm enough to activate your yeast?
I just wanted to double check the amount of yeast… 1 1/2 tablespoons?
That’s correct, and I use instant yeast in this recipe, not active dry yeast.
Just finished baking these and they smell absolutely heavenly! I did cut one open to see what it looked like inside, they are so pretty. My husband asked if he could eat one but I told him no as we are planning on using them for Philly cheesesteak sloppy joes tonight. Thanks for the easy recipe! I do plan on making these again but making them a day ahead to let the dough sit in the fridge overnight like most brioche doughs. Also I used active dry yeast as that was all I had.
YAY, hope you guys loved them! Thanks for the notes on the active dry yeast, and thanks for commenting here Sarah!
x
Jacqueline
Hi Jacqueline, I have 2 questions-
1. Can I substitute salted butter instead of unsalted since I don’t have it right now at home and that way I won’t add more salt to the flour
2. Can I just line the sheet with butter instead of butter paper?
Will be trying out this recipe for my family today .. quite excited! Thank you!
Hi,
1. Yes, you can substitute the butter.
2. Yes, instead of parchment paper just try oil or butter. When I bake bread in pans I only sometimes grease them so I think that should work without them sticking. I hope you enjoy them!
Can I leave the dough in the fridge overnight? Or could I shape the buns, refrigerate overnight, and bake in the morning? Thanks!
Hi Tori,
I haven’t done this myself but I would say the dough should be fine refrigerated overnight. I’ve done that with other dough recipes. It’ll just take some time to come to room temp and then rise the next day. Hope that helps!
I wanted to thank you for this recipe. With the world the way it is today, it’s not so easy to run to the store when you need hamburger buns. So I thought I would try my hand at making them and came across your recipe. My first attempt came out pretty good. My second attempt ended up looking like pancakes because I let them rise too long the second time. My third attempt was so perfect I wanted to cry. Noteworthy to only let them rise 30 minutes the second time and have your oven ready by the end of the 30 minutes so you can stick them right in after the egg wash. Great, easy recipe. My family thanks you and I will never be allowed to buy store bought hamburger buns again!
Thank you Kim for taking the time to comment! I’m glad you persevered with the recipe and had good results – I am so glad this worked out for your family. It’s such a win to be able to provide for our families in uncertain times.
Can you use a milk substitute for this recipe, such as coconut or almond milk?
Yes, I have used almond milk in this recipe before. Something without too much flavour on its own. Oat milk would probably be good too.
I followed the recipe to a T, they were a bit denser than store bought but the flavor was delicious. I pairs them with beef burger, grilled onions and peppers with balsamic glaze, and a red pepper mustard…..to die for. What did I do wrong since they were heavy?
Hi Karen,
I’m sorry the buns turned out dense for you. Did you weight the flour or measure it? A dense dough can be caused by too much flour, or sometimes yeast that’s not active. The dough should be quite sticky when you mix it – I find this one tip always helps me come up with a fluffy bun. Let me know if you have any other questions and I’ll do my best to help you make this recipe work for you.
Jacqueline
It is not sticky for mine as it is proofing now. 🙁 is there any way i can save it? I used 450g of flour and instant yeast.
Hi Melanie, You could try to knead some water into it slowly but I always find that adding water into a dough is tougher than adding flour in. See how they rise
This is an excellent recipe! I’ve made these buns more than a dozen times now and they turn out perfectly every time. I use room temperature eggs and regular yeast that I proof first for 5 mins. I live in Calgary Canada and our altitude is much the same as Denver Colorado, so i only have to use 2.5 cups of flour instead of 4.
When my buns come out of the oven they look absolutely perfect for the first 30 minutes, but then get a little deflated and wrinkly on top. Does this happen to you? They still taste wonderful but just wondering why this happens?
Hi Teri,
Thanks for this comment – I am so glad this recipe works again and again for you – it does the same for me and we love it too 🙂
And thank you for the information on altitude – the difference in the amount of flour needed is always so surprising to me, I’m sure that will be helpful for others trying this recipe in the same situation.
As for the wrinkly tops, I haven’t gotten that with this recipe but have with sandwich bread now and again. I’ve researched it a bit and (according to King Arthur Flour) it is probably due to the moisture and some condensation from the temperature changes when the buns go from baking to cooling. They suggest trying to cool them in the open oven. Might be worth a shot!
Also I just read back your comment – not sure about the deflation – maybe an extra minute or two of baking time?
Jacqueline
These look so good! Can they be used for sandwiches or better as dinner rolls?
We love them for sandwiches and burgers!
Thanks for sharing! Do they keep long?
Two to three days is the max we usually have them around. 🙂
The buns turned out picture perfect and delicious. Thank you for the recipe!
Thanks for the reply Deborah! I’m so glad it worked out well for you. Thanks for commenting.
Love this recipe, did the double rise and they were so light and fluffy perfect to griddle a bit for my beef burgers
Glad you liked them, thanks for commenting!
That is funny… – Broiche is my favorate bun for burgers, fabulous and delicious. Thanks for your quick and easy recipe. I hope to make these really soon. Will be back to comment….yum yum.
Thanks for your recipe.
Darlene
Thanks for your comment Darlene, I really hope you like these 🙂
Jacqueline
This turned out really well. Thank you for the recipe. Loved it.
Glad to know this, thanks for commenting 🙂
Hi, this is a great recipe. I was just wondering how to keep the buns soft after cooking? Mine have become quite dense a couple of hours after taking out the oven. Thanks 🙂
Hi Emily,
I keep my buns wrapped in plastic (I just re-use old bread bags). I haven’t had a problem with them drying out so quickly.
Jacqueline
This recipe is wonderful! I made it the last 2 times using 1/2 whole wheat flour (NOT pastry flour) & 1/2 all purpose. They turn out great & my husband can’t wait for them to cool down before he has to have one!
Simple & delicious 😋
Thanks!
Thank you Martie, for commenting, I’m glad you guys both loved this recipe!
Jacqueline
Been making these for years. I finally learned to rely on my senses instead of a timer when proofing and it has greatly improved my baking skill, so I encourage others to do so as well.
When I followed the directions to a T (room temp eggs, adding flour gradually, etc.) they came out picture perfect, exactly as in the photos. I’ve also substituted water for milk and completely forgot butter a few times and they still turn out great, lol. Thanks for sharing ☺
Good baking tips! Thanks for sharing and I’m so happy that you’ve been enjoying this recipe. Thank you for commenting!
Jacqueline
Nice one
Made this AMAZING Brioche Bun recipe over the weekend when we were having homemade hamburgers. Now my family won’t let me buy store bought buns ever again. They all said that these buns are a game changer. This was the first time I have ever tried to make homemade buns and this recipe was so simple to follow and easy to make. I will be making these over and over aian. Thank you for sharing such an amazing recipe.
Hi Crystal!
I love hearing this, so glad you and your family enjoyed this recipe 🙂
Jacqueline
Love this recipe. So easy to make with just a few simple ingredients.
Thanks for commenting Monika, I’m glad you like this recipe, it’s a fave of mine!
Saddened because there were so many great comments about these, but they came out dense and without flavor for me. I do everything by weight, so that could be the issue since you mix cup measuring with weight measuring. I would suggest having both ways listed so there isn’t any overage for ingredients. I’d say what did mine in was too much flour because you said 450-500g but suggested 3 – 3.5 cups of flour which comes out to 360-420g.
Hi Colleen,
I’m sorry to see you struggled with this recipe; most of the reviews here, and especially on Pinterest, show people having success with it. In step two of the recipe, I suggest starting with 2 1/2 to 3 cups of flour to begin with before adding more. Because you bake with weight, you’ll know that this is to help prevent people from adding too much flour. With your dense results, I’m guessing that is what happened somehow, or perhaps they didn’t rise long enough. I’d love to help you figure this out. Thanks for taking the time to share your experience.
Jacqueline
Hi These turned out light and fluffy and really tasty. I used honey instead of sugar and that made them so good. Thanks for the great and easy recipe.
Glad you enjoyed these, Barb. Thanks for taking the time to comment and rate the recipe!
Jacqueline
Mine turned out like brioche biscuits. Not what I expected, but still edible. I did two rises, maybe the second rise was not long enough.?? I might try again to get a fluffy bun.
Super good came out great
Excellent, glad to hear this! Thank you for taking the time to comment!
Jacqueline